
See also … Home Development Workstation – Part 1
If You Build It …
For starters, I give major props to Jeff Atwood’s series on building a PC, because the step-by-step assembly notes, and the overriding “calm down, it’s like Legos!” tone … all very comforting. I tend to be a “ready, fire, aim” kinda guy on my home technology projects, so a little common sense around the electrical equipment is always good.
I won’t replicate all of his build-in-process steps or pictures, just the highlights. One thing you will need is a decent work space – don’t try to build this on the floor of your den/home office.
The only tools I needed were a Phillips screwdriver and a little knife – lotsa packages to open!
Check Out The Case
- I was amazed by the heft of the P182 – it felt like a loaded PC, not an empty shell. Can’t wait to hoist it around when it’s full of components …
- Some extra work: a nice note from the manufacturer reported a chance that the fans misbehaved at low speeds. This was a defect they couldn’t catch until after assembly, so they threw three extra fans into the box, just in case. I didn’t want to mess with it later, so I swapped out two of the three – one was too difficult to get at, I’ll just take my chances. Plus, now I have three spares (more junk for the closet).
- Before you start adding components to the motherboard, dig out the back panel and “dry fit” the motherboard and back panel into the case. This wasn’t entirely plug and go, I had to fiddle around with the various tabs and knockouts to get it to come together. Take the motherboard back out, now we’ve got some tabletop work to do.
Building Up the Motherboard
- The memory sticks were bigger than I anticipated – and yes, I double checked, it’s physically impossible to put them in backwards
- Slip the processor into the slot on the motherboard per the directions – very simple stuff.
- The processor (CPU) is dwarfed by the cooling fan (Standard CPU Fan) that comes with it … but that’s not a real cooling system …
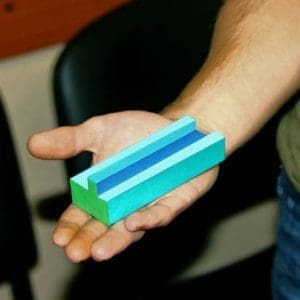
- … I was genuinely flabbergasted by the size of the IFX-14 CPU cooler (Main Heatsink). The picture below sizes it all up, next to some real world objects you may be more familiar with. In retrospect, I’m not entirely sure I needed the aftermarket CPU cooling system, but I appreciate the heat problem inherent in these types of machines, so I’ll just play along.

- Consider going through the entire heat sink installation “dry” – it involves sticky pads, screws and posts, and thermal paste (!). The instructions are capable, but not entirely idiot proof. The dry run is important, because we’ve now come to …
- OOPS #1 – The IFX-14 CPU cooler also comes with the IFX-10 backside motherboard cooler (Backboard Heatsink) – nice additional cooling, I suppose, but as I went through the dry fit to check how things line up in the case … erp, nope, the IFX-10 sticks out too far. Some geeky desktop jewelry, I suppose, but the big tower fit just fine, so the IFx-10 is out, and on we go.
- Another gotcha – attaching the fan. Slightly tricky, and the installation illustrations (which had been excellent to this point) left me with a puzzle. I finally figured it out, so here’s a pic to show exactly how to thread those wires (fan clips) through the holes. I’ve also called out the proper orientation of the anti-vibe strips – also, not called out well in the installation instructions.
Two bits of hindsight, for your benefit:
- Now that you’ve got the fan attached – take it back off. You’ll see why in a minute.
- Some system fans have a speed sensor for control – and the motherboard may have a specific power connector for that fan. Find it before you screw everything in place – might be hidden underneath Gigantor-sink.

Back to the Case
- The power supply fit is tighter than tight – aided by the anti-vibration strips inside the cage, I am sure. For this step, you will need to take both sides of the case off.
- Leave all of the power cables trailing out the nearest side of the case. As we install components, we’ll want to be crafty in how we thread the cables, to keep the interior as nice and clean (and maintainable, and expandable) as possible.
- Finally – in goes the motherboard. It’s easiest to get in there with the case lying in it’s side, but now I’ve got multiple power cables hanging out back there, so I’ll just have to make do.
- The case came with a bag full of a wide variety of screws, and no pictures in the documentation – but the bag-within-a-bag, labeled MB Only, was helpful. Put as many mounting screws in as you can reach – that heatsink gets in the way of one or two.
- Power supply to the motherboard – two cables! You’ll be able to hide most of these cables under the motherboard – snake them up through the available openings.
- OOPS #2 – This is where I had to (temporarily) remove the fan. The CPU power supply (cable #2 for the motherboard) “conveniently” plugs in right below the heat sink fan. I got it all to fit, but man, I’m really starting to rethink this whole aftermarket CPU cooler idea. Note that this is no slouch against the performance of the device; it was rated best by Tom’s Hardware – but it definitely is a tight fit.

They’re at the Post!
Why yes, I _am_ following Atwood, step by step. Trying hard not to duplicate his pictures, but augmenting his play by play with mine. Here’s the final turn for today …
- Install the video card. I’m keeping it simple, with a single GeForce 8600 GTS – supports dual monitors, which I dig, but I am not the hard core gamer.
- Power it up, and see if it starts.
Ok, full disclosure here – I unboxed the flat screen, threw on the keyboard, hit the power switch, and … nothing. Crestfallen, I reviewed everything, checked the manuals, and still nothing. Actually, I got an LED on the motherboard, but no video card fan, no POST. I wondered if the power-on LEDS are showing anything – so I had to find those. Opened the front door of the case and saw … the power switch. Yup, there is a case power switch along with the one on the back of the power supply. I think one of the on-line tutorials I read had pointed this out already, but I spaced it out. Immediate success followed …
… and here I type. I’m done for now, that was probably 2-3 hours of effort, elongated by my play-by-play blogging. Still, in retrospect, not too difficult.
Next time – fill up the case!

Comments (0)